
A nervous tap-tap in the quiet of the kitchen, a small sound that grows into a question you can’t ignore. Water bills rising. Sleep thinning. A simple drip daring you to act. The good news? This is one of those home fixes that rewards the brave and the mildly curious. No special kit. No waiting around. Just you, a screwdriver, and a tiny part that costs less than a coffee.
The kettle had just clicked off when I noticed it again — that clean, irritating ping of water on stainless steel. Midnight, cardigan on, phone torch balanced in my hand like a stage light. I nudged the handle, hoping for a miracle. The drip winked back and fell anyway. I thought of calling a plumber, remembered the last call-out fee, and laughed under my breath. A neighbour once told me her dad could stop a leak with a new washer and a biscuit tin of old screws. She was right. The secret sits under a tiny cap.
Why taps drip — and why it’s easier than you think
Most leaks aren’t disasters. They’re wear and tear in miniature — a flattened rubber washer on an older compression tap or a tired ceramic cartridge in a modern mixer. That gentle drip is the sound of a seal not quite sealing. Water finds the smallest invitation. The fix is surprisingly straightforward. You’ll turn off the water, take off the handle, lift out a small part, pop in a new one, and put it all back together. That’s it. **No plumber required**.
We’ve all had that moment where a tiny household problem swells into a saga. A leaky tap can waste 12 to 20 litres a day — more if the flow becomes a thread. On a meter, that’s money escaping between the seconds. A reader messaged me last week: he timed himself at eight minutes, swapped a washer, and spared himself a £70 call-out. He sent a photo of the silence, which is a funny thing to photograph. The sink looked the same. The room sounded different.
Think of a tap in two families. Compression taps turn multiple times and seal with a rubber washer. Mixer or quarter-turn taps roll on ceramic discs inside a cartridge. If it drips from the spout, the internal seal is the culprit. If it leaks around the handle, the little O-ring or gland packing is getting cheeky. Limescale can grind these parts down faster, especially in hard water areas. Remove the old component, match like for like — 1/2-inch washers fit most basin taps, 3/4-inch for bath — and you’re halfway home.
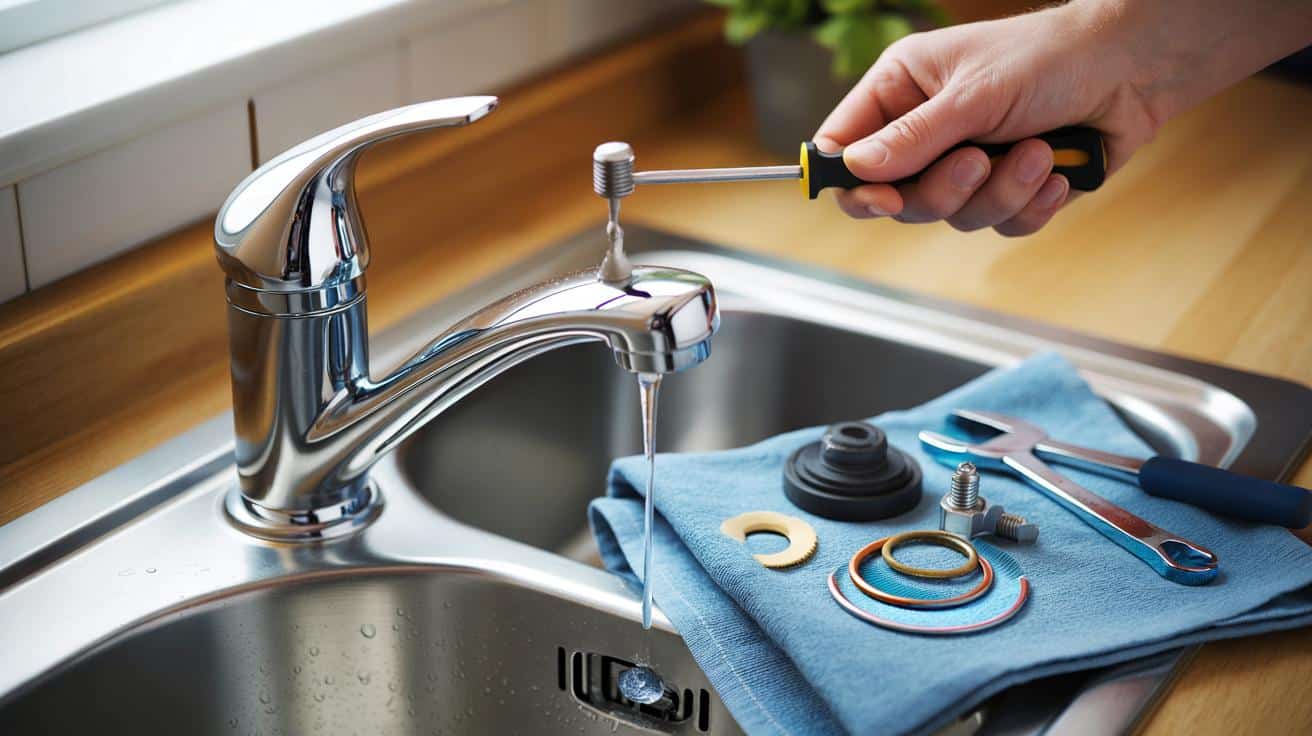
The 10-minute fix, from first twist to last turn
Start by stopping the water. Look for the small isolator valves on the pipes under the sink and twist them a quarter-turn with a flathead. If you can’t find them, go to the stopcock near the front door or under-stairs and turn clockwise. Pop the little cap on the tap handle with a fingernail or butter knife, undo the screw, and lift off the handle. Slip a cloth over the chrome, then use an adjustable spanner to loosen the stem or cartridge. Swap the washer or cartridge. Rebuild the way you came.
A towel in the basin is your friend. Drop one tiny screw and you’ll watch it skitter for freedom. Photograph each stage on your phone so the reassembly feels like matching pictures, not a memory test. Don’t muscle the spanner — a firm, flat bite beats a scratchy slip. If the parts are crusted white, a soak in warm vinegar helps. Let’s be honest: nobody labels their isolators or keeps a washer diary. You’ll get away with common sense and a tiny bit of patience.
When you’re tightening the new part, seat it snug, not heroic. Overtighten and you’ll bruise the threads or crack a ceramic. A smear of silicone grease on O-rings makes them glide and last. If the handle wobbles, you likely missed a small retaining screw; if the drip persists, double-check you’ve fitted the right-sized washer or the correct cartridge model number, often etched on the old one.
“It’s a five-minute job if you don’t drop the tiny screw — ten if you make a brew.”
- Tools: flathead screwdriver, adjustable spanner, replacement washer or cartridge, cloth, towel, cup or tray for parts.
- Steps: isolate water, remove handle cap, undo screw, lift handle, loosen stem/cartridge, replace part, reassemble, turn water on slowly.
- Quick checks: no wobble, smooth turn, dry around base, no drip after a minute.
What comes after the hush
There’s a small joy in hearing nothing. After the final turn, you stand there, listening to silence, and it’s a better silence than before. If your tap still weeps, the seat under the washer might be pitted. A cheap reseating tool can polish it in a minute, or you can fit a washer with a raised lip. Lives in hard-water areas benefit from a quick descaling — kettle vinegar, old toothbrush, a soft cloth. **Silence at last** feels like a tiny upgrade to the whole house.
Some taps are worth retiring. If your quarter-turn mixer stiffens every month, it’s asking for a fresh cartridge or a modest replacement. Newer taps with aerators save water and feel lovely, like a soft brush of water rather than a shove. Share the trick with someone who’s been putting it off. The minute you admit it’s doable, it’s almost done. *Ten minutes is plenty.*
You don’t need a workshop or a van full of tools. You need a steady hand, a photo or two as breadcrumbs, and the confidence to turn the water back on slowly. If you hear nothing, you did it right. If you hear the drip again, you’re now the person who knows what to try next. That’s the difference a small fix makes. **Ten-minute fix**, big mood change.
| Key point | Detail | Interest for the reader |
|---|---|---|
| Know your tap type | Compression (rubber washer) vs ceramic disc (cartridge); quarter-turn usually means ceramic | Pick the right part first time and finish faster |
| Isolate quickly and safely | Use under-sink isolators if present; otherwise turn the main stopcock clockwise | Prevents mess and keeps the job calm |
| Replace the right seal | 1/2-inch washer fits most basins; match cartridge model numbers for mixers | Stops the drip in minutes and avoids repeat work |
FAQ :
- How do I tell if I have a ceramic disc tap?Turn the handle. A quarter-turn from off to on usually means ceramic discs. Multiple turns that tighten down onto a seat means a compression washer.
- Which washer size do I need?Most basin taps use 1/2-inch washers, bath taps 3/4-inch. Take the old one to the shop or measure across the valve seat to match it.
- What if it still drips after I change the washer?The valve seat may be pitted or the O-ring on the stem is worn. Reseat the tap or replace the O-ring. For ceramic taps, replace the full cartridge.
- Can I fix a mixer tap the same way?Yes, but you’ll swap the cartridge rather than a washer. Isolate both hot and cold supplies, remove the handle and shroud, then lift and replace the cartridge.
- Will turning off the mains harm my boiler?No, turning off the cold mains for a short job is fine. Turn the water back on slowly to protect filters and aerators from sudden pressure.


Followed this at 1 a.m. and the drip is gone. Turned off the isolators, swapped a 1/2-inch washer, and the silence is glorius. Honestly didn’t know the cap on the handle just pops off! Only hiccup: the old washer was cemented on with limescale—vinegar soak did the trick. Thanks for the confidense boost.